camera de iridologie ce?
aparat de fotografiat pentru iridologie

aparat de fotografiat pentru iridologie

aparat de fotografiat pentru iridologie

aparat de fotografiat pentru iridologie
Cea mai nouă cameră portabilă USB 12.0 MP CCD pentru iridologie-Tip: cameră de iridologie, Certificare Protable: CE Locul de origine: Guangdong, China (continentală) Nume de marcă: Qianhe Număr de model: QH-990UNeme: cameră de iridologiePixeli: 12,0 Mega pixeliOxuloare: alb și roșu rezoluție: 2560 × 1920 OS: WIN2000, 2003, Vista, Win7,8, 10 pachete Cutie: Aluminiu Dimensiune pachet: 31,0 * 33,0 * 312,0 cm
Greutate bruta: 2,0 kg
Cea mai nouă cameră portabilă USB iridologie 2018, CCD de 12,0 MP
Introducerea camerei pentru iridologie de 12,0 MP
Sistem de analiză a irisului: tehnologie internațională, funcții unice.
* Sistemul de analiză a irisului este un instrument medicinal care verifică starea corpului și
previne apariția bolilor.
* Am adus tehnologia avansată de analiză a irisului din Germania pentru a conduce
oamenii să descopere surse de boală și să îngrijească oricum sănătatea corpului și spiritul.
* Instrumentul poate arăta condițiile corporale ale clienților și poate sugera
clienților hrana potrivită pentru sănătate și planurile de îngrijire a corpului lor.
1Tehnologie avansată de analiză automată a irisului pentru a oferi cel mai bun ajutor pentru începători.
2) Software ușor de utilizat, vă ajută să comandați.
3)Recomandăm utilizarea rezoluției 1024X768, va fi cea mai bună.
4) Recomandați să utilizați sistemul WIN2000, 2003, Vista, Win7,8,10.
Caracteristica camerei de iridologie CCD de 12,0 MP
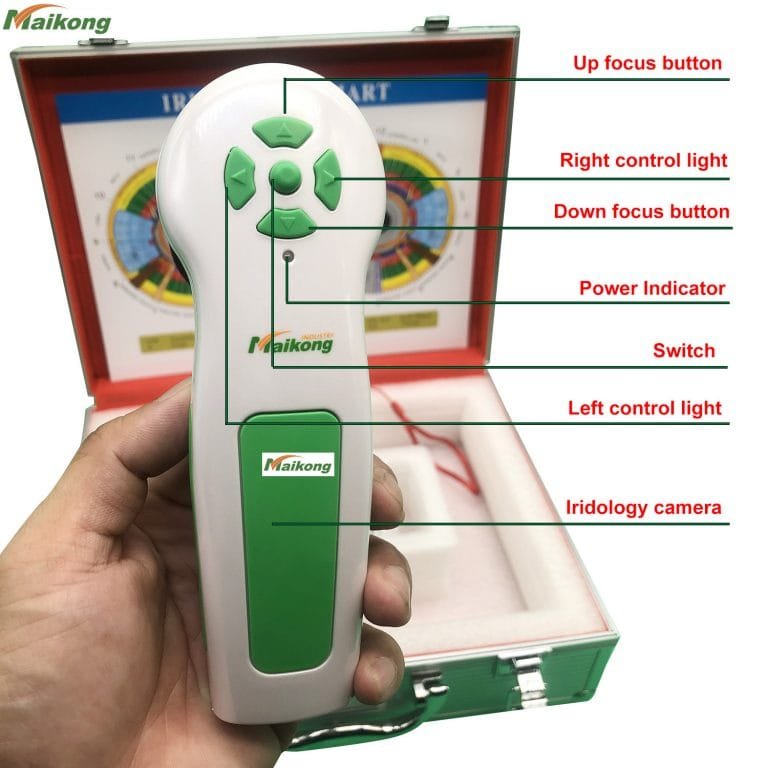
* Aspect frumos și design inovator * Iluminator LED în jurul lentilei * Lentilă importată cu strat placat * Senzor CCD de înaltă rezoluție de 12,0 mega pixeli * Procesor de imagine DSP special, stabilizator optic de imagine * Buton de captură unic și captură digitală de pauză. * Focalizare reglabilă pentru a oferi o imagine clară. * Balans de alb automat și ajustare a contrastului, filtru de temperatură de culoare * Funcție duală de comparare a imaginii * Mod de captură 3D-negativ * Compatibil cu lentile iris, lentile de păr. * Oferiți imagini clare și precise. * Ușor de operat. * Rezoluție maximă: 2560×1920
* OS: , WIN2000, 2003, Vista, Win7,8 ,10
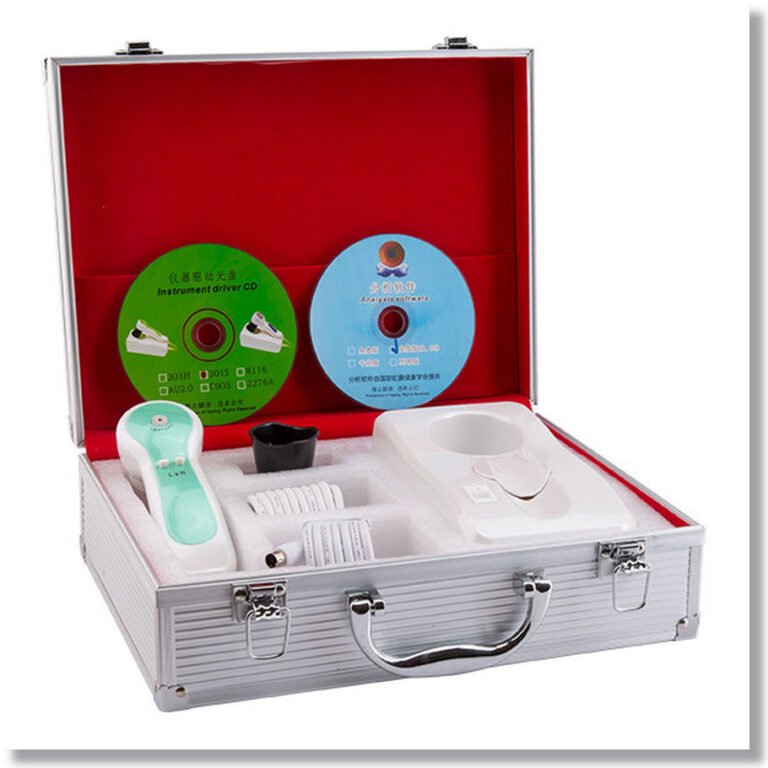
Accesorii camerei de iridologie de 12,0 MP
aparat de fotografiat pentru iridologie
Receptorul
1pc
Lentila iris 30X
1pc
Cutie de aluminiu
1pc
Linie USB de 1,5 metri
1pc
Capac de protecție a lentilelor
1pc
TABLA DE IRIDOLOGIE
1pc
Instrucţiuni & garanție
1pc
CD (Driver și software de analiză Pro)
1pc
Doriți mai multe informații despre camera de iridologie, vă rugăm să ne contactați:

aparat de fotografiat pentru iridologie

aparat de fotografiat pentru iridologie

aparat de fotografiat pentru iridologie

aparat de fotografiat pentru iridologie
aparat de fotografiat pentru iridologie cum se fac imaginile?
Cum să-ți faci fotografii cu irisul cu camera iridology-Pentru a face cele mai bune fotografii pentru lectură, setează-ți camera la MACRO și încearcă, dacă este posibil, să folosești lumina interioară naturală, în timpul zilei, cu un bliț. Setați dimensiunea fotografiei pentru o rezoluție mai mare, cu un minim de 1,2 M (2208 x 1248). 1,2 M (2784 x 1568) este cel mai bun.
Pasul 1: Faceți fotografii cu irisul dvs. cu o cameră digitală
Setați Camera la setarea Macro.
Creșteți rezoluția la 1,2 M (2784 x 1568).
Porniți Flash.
Utilizați lumina zilei interioare.
Stați în lateral față de orice fereastră (cu fața către fereastră va provoca strălucire).
Puneți pe altcineva să țină camera sau să folosească un trepied și un cronometru.
Țineți pleoapele superioare și inferioare deschise pentru a face vizibil întregul iris.
Faceți câte o fotografie fiecărui iris o dată.
Țineți ochii aproape de cameră. În setarea macro, puteți fi la 4-5 inci de lentilă.
Pasul 2: Verificați fotografiile pentru iluminare și claritate
Verificați fotografia în vizorul camerei dvs. Utilizați funcția de zoom pentru a vedea irisul.
Asigurați-vă că irisul este clar; altfel incearca din nou.
Asigurați-vă că nu există ochi roșii; în caz contrar, activați „reducerea ochilor roșii” și încercați din nou.
Asigurați-vă că întreg irisul este vizibil; altfel incearca din nou.
Asigurați-vă că nu există o strălucire semnificativă pe iris; altfel, întoarce-ți ușor corpul de la orice fereastră și încearcă din nou.

Rapoarte de analiză a iridologiei

Rapoarte de analiză a iridologiei


software pentru camere iridologie

software pentru camere iridologie

software pentru camere iridologie

Pasul 3: Trimiteți prin e-mail rezultatele finale ale fotografiilor cu iris
Puteți decupa fotografiile astfel încât doar ochiul să fie vizibil pentru a reduce dimensiunea fișierului.
Dacă este prea multă muncă, atunci pur și simplu trimiteți prin e-mail întreaga fotografie.
Puteți trimite 3-5 fotografii cu ochiul stâng într-un singur e-mail.
Puteți trimite 3-5 poze cu ochiul drept într-un alt e-mail.
Utilizarea unei camere digitale: instrucțiuni video despre cum să faci fotografii cu iris
Utilizarea unui iPhone: Instrucțiuni video despre cum să faci fotografii cu Iris
Exemple de trimiteri inacceptabile de fotografii cu iris
NU! Ambele exemple au strălucire semnificativă, ceea ce face ca porțiuni din iris să nu fie citite
În primul exemplu de mai sus, persoana se afla probabil în fața unei ferestre, ceea ce a făcut ca strălucirea să apară în iris. Soluția: Întoarceți-vă ușor de fereastră și încercați din nou.
În cel de-al doilea exemplu, este posibil ca această fotografie să fi fost făcută noaptea sau într-o cameră fără ferestre și doar cu lumină de deasupra. Datorită luminii mai întunecate din cameră, lumina se refractă în iris, provocând strălucire semnificativă și făcând fotografia neclară. Soluția: faceți fotografia în lumina zilei interioare, fără iluminare deasupra capului. Iluminatul lateral este de obicei ok.
O cantitate mică de strălucire în pupilă (punctul negru din centrul irisului) este ok.
NU! A nu privi direct obiectivul camerei creează o imagine distorsionată a irisului
În cele 2 exemple de mai sus, indivizii încearcă cel mai probabil să facă fotografiile ei înșiși, așa că se uită din neatenție la camera foto în timp ce încearcă să facă fotografia.
Soluția: cere altcuiva să țină camera fermă pentru tine sau folosește un trepied cu temporizator.
NU! În aceste fotografii, partea de sus și/sau de jos a irisului este acoperită
Când faceți fotografii, verificați pentru a vedea dacă întreaga porțiune de culoare a ochiului este vizibilă, în special partea de sus și de jos. Dacă aveți tendința de a avea ochii „căzuți”, doar trageți ușor pielea departe de ochi folosind degetul mare și arătător.
Exemple de trimiteri acceptabile de fotografii cu iris
DA!! Fotografii perfecte – observați blițul în interiorul pupilei și irisul complet vizibil
DA!! Deși fotografiile nu sunt perfect clare, aceste 2 exemple sunt încă lizibile
DA!! Fotografii foarte bune – iris complet vizibil, clar și ușor de citit pentru iridologie
DA!! Fotografii perfecte – observați blițul în interiorul pupilei și irisul complet vizibil
DA!! Fotografii perfecte – observați blițul în interiorul pupilei și irisul complet vizibil
Aflați la ce să vă așteptați de la analiza dvs. de iridologie la Iridology Explained.
Găsiți răspunsuri la orice întrebări suplimentare despre iridologie și cum funcționează la Iridology – Întrebări frecvente.
Începe acum! Programează-ți o programare online la Book Your Iridology Consultation.
Iridologia nu poate diagnostica o anumită boală.


software-ul camerei iridologie ce poate face?
1) adăugați informații despre client la software.
2) Editați sau ștergeți informațiile despre client.
3) Duceți imaginile ochilor iridologie la software.
4) Analiza imaginilor de iridologie oculară.
5) Pintați rapoartele de analiză iridologie.
6) Compararea imaginilor înainte și după iridologie ochilor.
7) Compararea rapoartelor de analiză iridologie.
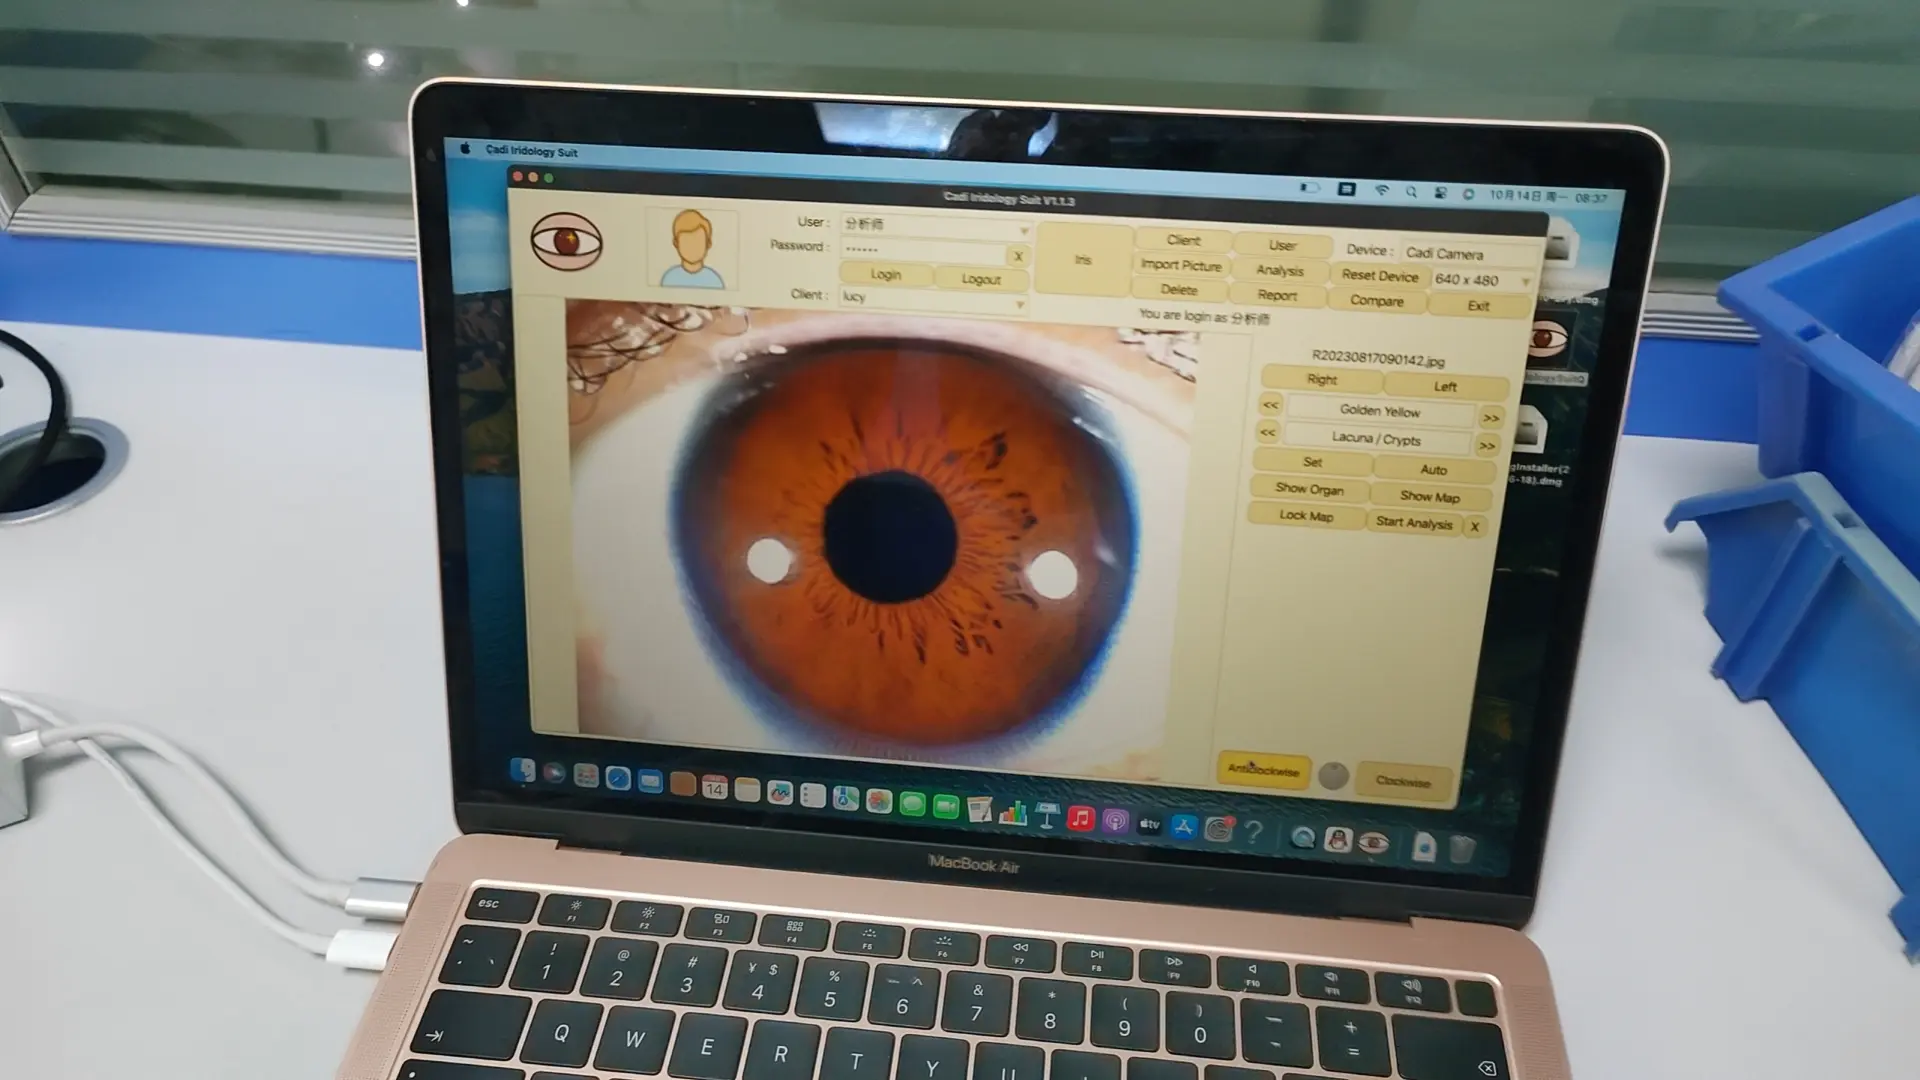
Cum se folosește Sistemul de analiză ADVANZĂ CADI CV Versiunea engleză Versiunea automată de iridologie automată?
1) Deschideți desktop “CadiCV Advance Analysis System versiunea în engleză”
2) Utilizați selectați “utilizator”, Parolă: 111111 și faceți clic pe: “log in”
3) Faceți clic “instrument client”, introduceți informațiile despre clienți. Dacă ok, faceți clic “adăuga”,şi
click”aproape”
4) Faceți clic “capta ochiul drept”.–clic “capta”, Repetarea ochilor Stânga Ultima pas.
5) Selectați imaginea ochiului (imaginea ochiului din dreapta / imaginea ochiului stâng)
6) Faceți clic “analiză”
7) Faceți clic “setați parametrul” buton.
1. Puneți săgețile mouse -ului în centrul elevului, faceți clic pe tasta stângă a mouse -ului,
2. Scoateți săgețile de margine a mouse -ului, faceți clic pe tasta stângă a mouse -ului,
Al treilea. Remove săgețile mouse -ului dintre Iris și Sclera, apoi faceți clic pe tasta stângă a mouse -ului.
Și faceți clic pe butonul „Setare parametru”.
8) Faceți clic “analiza irisului” buton și faceți clic pe butonul „Afișați organul”.
Apoi alegeți ce parte a ochiului doriți să analizați, să vedeți culoarea și
Formați, în cele din urmă, faceți clic pe culoarea și forma sa, după cum urmează „maro, forfetare”,
Eliminați săgețile mouse -ului pentru a alege partea corectă, în cele din urmă, puteți vedea următoarele
Imaginea rezultatelor analizei, dacă alegeți „culoare sau formă” este greșit, nu există niciun rezultat al piesei
NOTĂ: Când puteți citi rezultatul analizei de fiecare dată, vă rugăm să faceți clic pe „Adăugați în raport” al ochiului drept, stocați
Rezultatul analizei. Desigur, puteți continua în orice parte a ochiului drept, repetați pentru a alege culoarea și
formă.
Când terminați analiza ochilor potriviți, vă rugăm să faceți clic din nou la „Analiză”, apoi alegeți „stânga” ochiului, pentru
Repetați mai sus căile de funcționare.
9). Când terminați analiza tuturor pieselor, faceți clic din nou pe „analiza”, apoi faceți clic pe „Salvare”, pentru a stoca a
Completarea rezultatului analizei IRIS a clienților.
10) Faceți clic pe butonul butonului „Raport client” și faceți clic pe numele Report,

software cadi iridologie

software cadi iridologie
camera de iridologie manaul
Cameră pentru iridologie IR-9915U de vânzare


