Iridologia dell'iriscopio

Iridologia dell'iriscopio

Iridologia dell'iriscopio

recensioni sull'iriscopio
What is 12MP iriscope iridology?
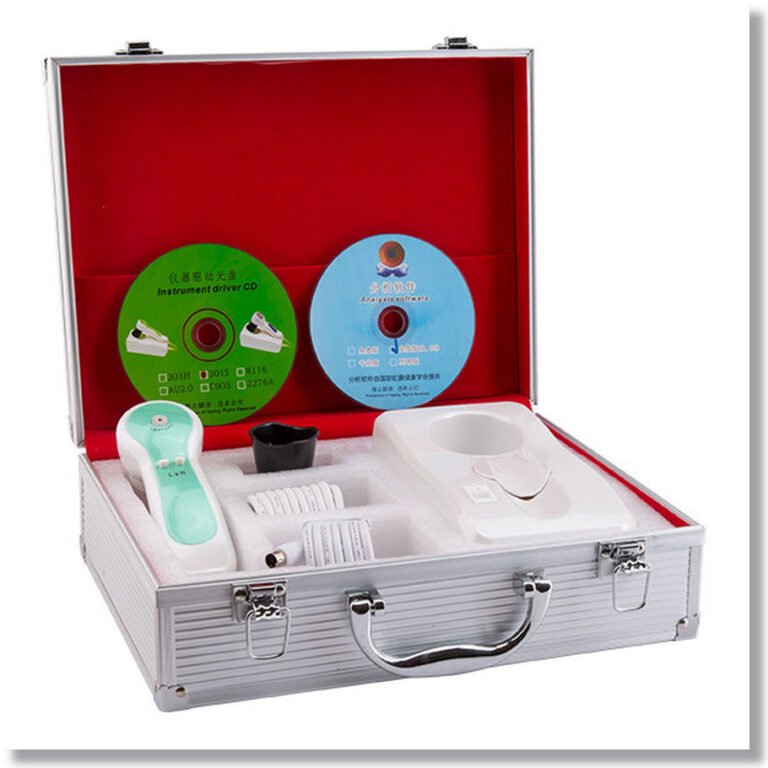
Accessori:
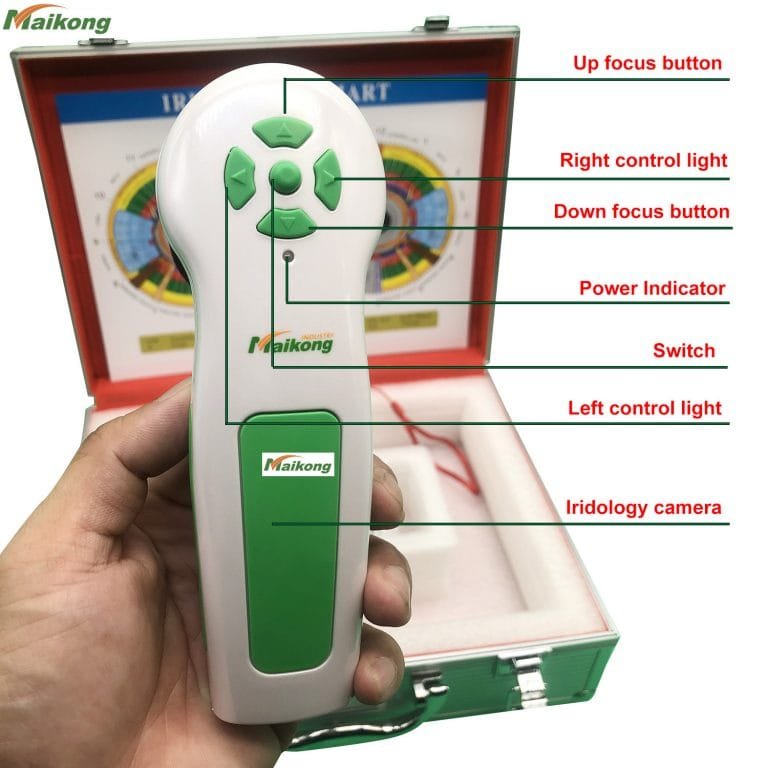
1. Handset x1pc
2. 30x lenti iris x1pc
3. Piatta PU in pelle X1pc
5. Linea USB da 1,5 metri X1pc
6. Copertura protettiva delle lenti x1pc
Pacchetto:
* Grafico IRIDOLOGIA X1PC
* Istruzioni & Garanzia x1pc
* CD (software di analisi driver e pro) X1pc
What is the primary benefit of photo iridology ?
Not only does it bring clues to your iridology analysis, but it helps to create a better connection with your patient. The patient, who’s naturally curious, is eager to see their own iris. With some simple explanations they can get a basic understanding of your analysis. The connection with your patient strengthens and their understanding of their process improves.
Iridologia dell'iriscopio
* Sistema di analisi dell'iride: tecnologia internazionale, funzioni uniche.
* Il sistema di analisi dell'iride è uno strumento medicinale che controlla le condizioni del corpo e impedisce che si verifichi malattie.
* Abbiamo portato la tecnologia avanzata dell'analisi dell'iride dalla Germania per condurre le persone a scoprire fonti di malattia e comunque cura della salute del corpo e dello spirito.
* Lo strumento può mostrare le condizioni del corpo dei clienti e suggerire ai clienti gli alimenti salutari adeguati e i piani per prendersi cura dei loro corpi.
Guarigione con iridologia:
L'iride perfetta non è mai stata vista e tutti gli individui presentano un certo grado di debolezza dei tessuti, sia che sia stata acquisita e sviluppata da abitudini e ambiente di salute discutibili o da genitori di trucco genetico.
La guarigione viene dalla parola radice che significa intera. Così fa la salute e il santo!
La guarigione deriva dalla cura di tutte le aree di tutto il nostro io, essendo mente, corpo e spirito.
In my opinion, when you get rid of what the body can’t use and give it what it needs, the body will do the rest. The body is a wonderful incredible specimen. Everyday it breathes by itself, the heart pumps by itself, if you cut yourself or break a bone, they heal by themselves. You never have to tell your body what to do automatically. Our responsibility is to provide the elements for the body.And you are the only one who can do that.
12MP iriscope iridology Specifications
1. Alta risoluzione, REAL 2 Magepixel Immagini
2. Facile operazione senza installazione del driver
3. Pacchetto in pelle di lusso
12MP iriscope iridology Instruction:
* Bell'aspetto e design innovativo
* Illuminatore a LED intorno all'obiettivo
* Lente importato con strato placcato
* 8.1 Mega pixels high resolution CCD sensor
* Processore di immagine DSP speciale, stabilizzatore dell'immagine ottica
* Pulsante di acquisizione singolo e cattura di pausa digitale.
* Focus regolabile per dare un'immagine chiara.
* Bilancio bianco e regolazione del contrasto, filtro a temperatura colore
* Funzione di confronto a doppia immagine
* Modalità di acquisizione 3D negativa
* Compatibile con lente iris, lente per capelli.
* Fornire immagini chiare e accurate.
* Facile da usare.

Iridologia dell'iriscopio

Iridologia dell'iriscopio
How Choosing an iriscope iridology
Essential elements to look for in iriscope iridologys
Il nostro sistema a fibre ottiche con illuminazione fredda riduce al minimo l'irritazione del cliente e fornisce un'illuminazione diurna precisa per un'esposizione ottimale e colori realistici ogni volta. Include la regolazione dell'intensità variabile per consentire anche agli occhi più scuri di visualizzare ogni dettaglio senza perdita di contrasto! Inoltre, le nostre luci evitano le pupille per evitare di inserire artefatti in quest'area di valutazione vitale.
Funzionamento facile. Ottieni una messa a fuoco perfetta con facilità.
Una delle caratteristiche più importanti da considerare è l’illuminazione. Il nostro sistema di illuminazione fissa garantisce una facile analisi comparativa. Opzione di illuminazione laterale inclusa.
Il nostro designer ha più di 30 anni di esperienza clinica come ND e iridologo, portando con sé una profonda comprensione di ciò di cui hanno bisogno gli iridologi professionisti.
Utilizziamo solo fotocamere attuali di alta qualità e materiali di livello professionale. La maggior parte dei nostri sistemi di telecamere includono nel prezzo un software di analisi all'avanguardia.
Tutte le nostre fotocamere soddisfano i criteri fotografici dell'iridologia. In effetti, siamo all'avanguardia nella fotografia dell'iride!
Come scattare foto dell'iride con la fotocamera per iridologia
How To Take Your Iris Photos by iridology iriscope iridology
To take the best photos for your reading, set your iriscope iridology to MACRO and try, if possible, to use natural, daytime indoor light with a flash. Set the size of the photo for a higher resolution, with a minimum of 2.5M (2208 x 1248). 4.5M (2784 x 1568) is best.
Step 1: Taking Your Iris Photos with a Digital iriscope iridology
Set iriscope iridology to Macro Setting.
Aumenta la risoluzione a 4,5 M (2784 x 1568).
Attiva Flash.
Utilizzare la luce del giorno interna.
Stare lateralmente da qualsiasi finestra (rivolgersi alla finestra causerà abbagliamento).
Have someone else hold the iriscope iridology or use a tripod and timer.
Tieni aperte le palpebre superiore e inferiore per rendere visibile l'intera iride.
Scatta una foto di ciascuna iride alla volta.
Keep the eye close to the iriscope iridology. On Macro Setting, you can be 4-5 inches from the lens.
Step 2: Checking Your Photos for Lighting and Clarity
Check the photo on the Viewfinder of your iriscope iridology. Use the zoom feature to see the iris.
Be sure the iris is clear; otherwise try again.
Assicurati che non ci siano occhi rossi; altrimenti attiva la "riduzione occhi rossi" e riprova.
Assicurati che l'intera iride sia visibile; altrimenti riprova.
Assicurati che non ci siano riflessi significativi sull'iride; altrimenti allontana leggermente il corpo da qualsiasi finestra e riprova.
Step 3: Emailing Your Final Iris Photo Results
È possibile ritagliare le foto in modo che sia visibile solo l'occhio per ridurre le dimensioni del file.
Se questo è troppo lavoro, invia semplicemente l'intera foto via e-mail.
Puoi inviare 3-5 immagini dell'occhio sinistro in un'unica e-mail.
Puoi inviare 3-5 immagini dell'occhio destro in un'altra email.
Using a Digital iriscope iridology: Video Instructions on How to Take Iris Photos
Using an iPhone: Video Instructions on How to Take Iris Photos
Esempi di invii di foto di Iris non accettabili
NO! Entrambi questi esempi presentano un riflesso significativo, rendendo illeggibili parti dell'iride
In the first example above, the person was likely facing a window, causing the glare to appear in the iris. The solution: Turn slightly away from the window and try again.
In the second example, it is likely that this photo was taken at night or in a room with no windows and only overhead light. Due to the darker light in the room, the light is refracting off the iris, causing significant glare and making the photo blurry. The solution: Take the photo in indoor daylight with no overhead lighting. Side lighting is usually ok.
Un piccolo riflesso nella pupilla (il punto nero al centro dell'iride) va bene.
NO! Not looking directly at the iriscope iridology lens creates a distorted image of the iris
In the above 2 examples, the individuals are most likely trying to take the photos themselves so they are inadvertently looking at the iriscope iridology while trying to take the photo.
The solution: Have someone else hold the iriscope iridology steady for you or use a tripod with a timer.
NO! In queste foto, la parte superiore e/o inferiore dell'iride è coperta
When taking your photographs, check to see that the entire color portion of the eye is visible, especially the top and bottom. If you tend to have ‘droopy’ eyes, just gently pull the skin away from the eye using your thumb and forefinger.
Esempi di invii di foto di Iris accettabili
SÌ!! Foto perfette: nota il flash all'interno della pupilla e l'intera iride visibile
SÌ!! Sebbene le foto non siano perfettamente nitide, questi 2 esempi sono ancora leggibili
SÌ!! Foto molto buone: iride completa visibile, chiara e facile da leggere per l'iridologia
SÌ!! Foto perfette: nota il flash all'interno della pupilla e l'intera iride visibile
SÌ!! Foto perfette: nota il flash all'interno della pupilla e l'intera iride visibile
Scopri cosa aspettarti dalla tua analisi iridologica su Iridology Explained.
Trova le risposte a qualsiasi domanda aggiuntiva sull'Iridologia e su come funziona nelle Domande frequenti su Iridologia.
Inizia ora! Fissa il tuo appuntamento online su Prenota la tua consulenza iridologica.
L’iridologia non può diagnosticare una malattia specifica.

recensioni sull'iriscopio

software per iriscopio

Iridologia dell'iriscopio

recensioni sull'iriscopio
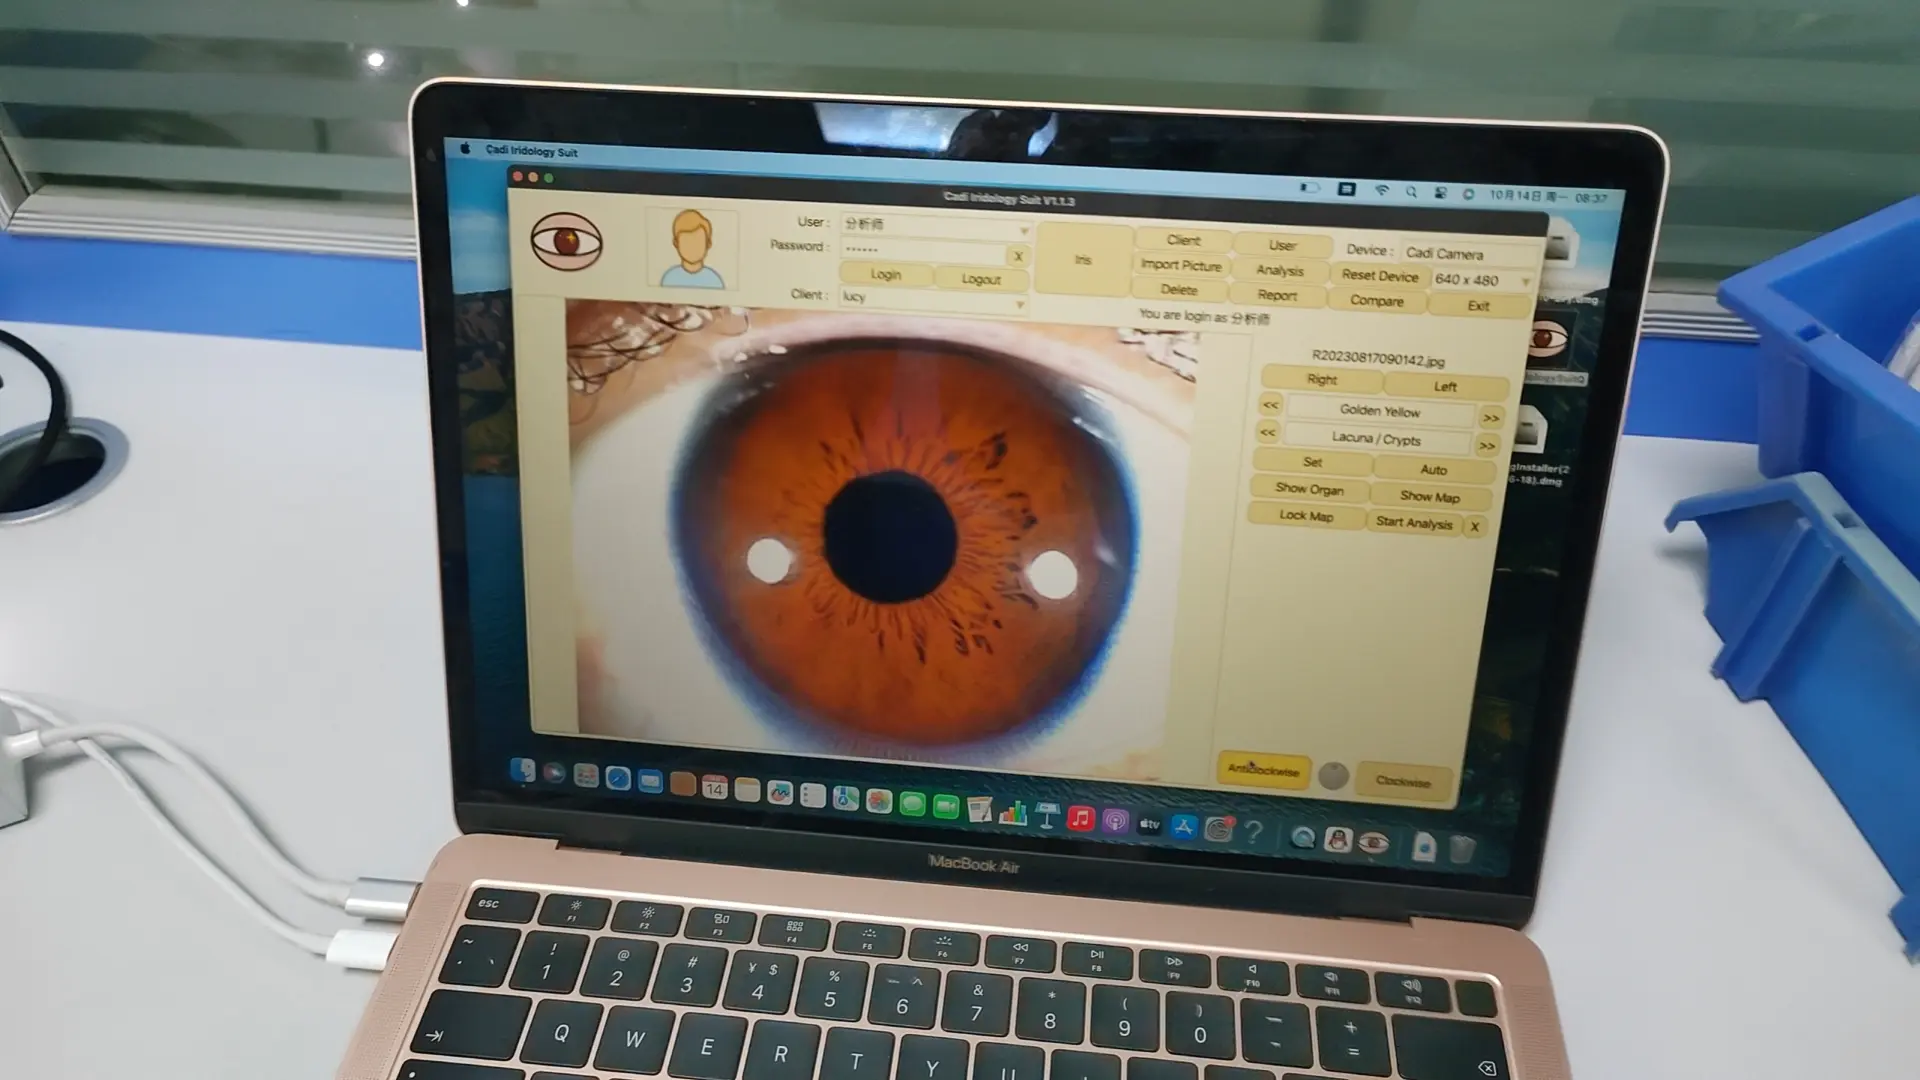
Come utilizzare il software di Iridology Auto Iridology del sistema di analisi anticipata cadi CV?
1) Aprire il desktop il “CadiCV Advance Analysis System Versione inglese”
2) Utilizzare Seleziona “utente”,password:111111,e fare clic su: “login”
3) Clicca “strumento cliente”, inserisci le informazioni del tuo cliente. se ok, clicca “aggiungere”,E
Clieck”vicino”
4) Clicca “catturare l'occhio destro”.–clic “catturare”, Ultimo passo della ripetizione dell'occhio sinistro.
5) Seleziona la foto dell'occhio (foto dell'occhio destro / foto dell'occhio sinistro)
6) Click “analisi”
7) Click “impostare il parametro” pulsante.
1 °. Metti le frecce del mouse al centro della pupilla, fai clic sul tasto sinistro del mouse,
2 °. Rimuovere le frecce del bordo del mouse della pupilla, fare clic sul tasto sinistro del mouse,
3 ° Rimuovi le frecce del mouse tra Iris e Sclera, quindi fai clic sul tasto sinistro del mouse.
E fare clic sul pulsante "Imposta parametro".
8) Clicca “analisi dell'iride” Pulsante e fai clic sul pulsante "Mostra organo".
Quindi scegli quale parte dell'occhio vuoi analisi, visualizza il suo colore e
forma, finalmente fai clic sul suo colore e forma, come segue "Brown, grumo",
Rimuovi le frecce del mouse alla tua parte selezionata, finalmente, puoi vedere quanto segue
Picture di risultato di analisi, se si sceglie "colore o forma" è sbagliato, nessun risultato della parte
Nota: quando è possibile leggere il risultato dell'analisi ogni volta, fai clic su "Aggiungi a report" dell'occhio destro, memorizza
il risultato dell'analisi. Naturalmente, puoi continuare a qualsiasi parte dell'occhio destro, ripetere per scegliere il colore e
forma.
Quando si termina l'analisi degli occhi destra, fai di nuovo clic su "Analisi", quindi scegli "Sinistra" dell'occhio, a
Ripeti i modi dell'operazione sopra.
9). When you finish all parts analysis , please click “analysis” again, then click “save”, to store a
Completo del risultato dell'analisi dell'iride del cliente.
10) Pulsante pulsante "Rapporto del cliente" e fare clic sul nome di sostituzione,

iriscopio usb

portable iriscope

iriscopio usb

iriscopio usb


